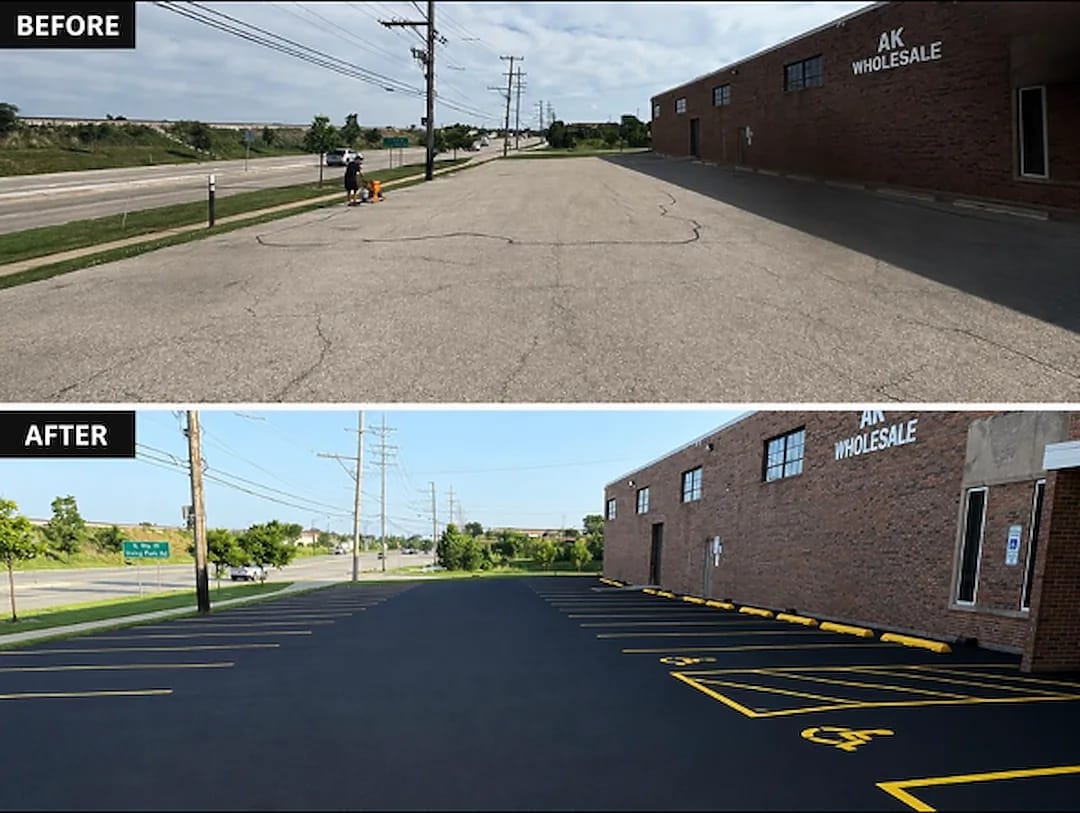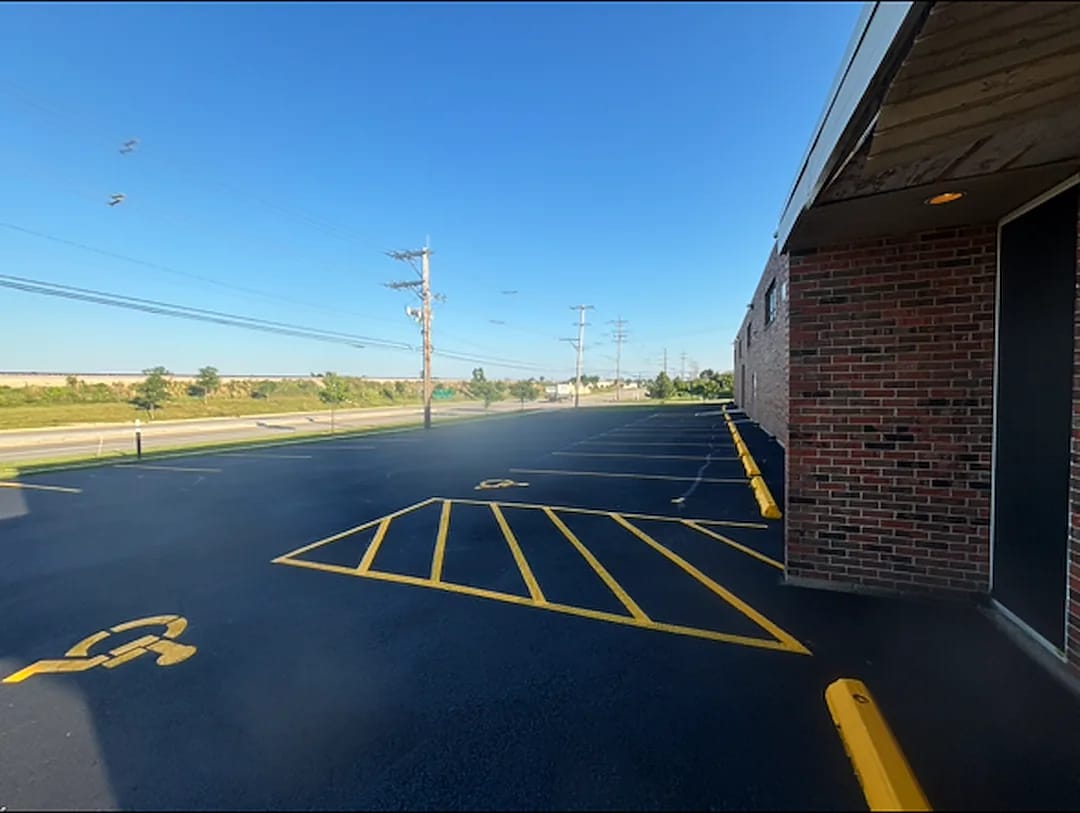
The number of accessible parking spaces your lot needs is set by your total space count, and a proportion of those must be van-accessible. But the stall count is only where it starts. A correctly numbered lot still fails if the access aisle is missing, the signage is mounted too low, or the route from the aisle to the door is blocked by a curb. Accessible parking is the most commonly cited deficiency we see on commercial lots in Chicagoland, and it is also the easiest for a complainant to photograph from the street.
This is a checklist for walking your own lot and finding the obvious problems before somebody else does.
How many accessible spaces does your lot need?
The federal scoping requirement (ADA Standards §208.2) sets a minimum number of accessible spaces based on the total number of spaces in the lot. The table below reproduces that scoping.
| Total spaces in lot | Minimum accessible spaces required | | --- | --- | | 1 to 25 | 1 | | 26 to 50 | 2 | | 51 to 75 | 3 | | 76 to 100 | 4 | | 101 to 150 | 5 | | 151 to 200 | 6 | | 201 to 300 | 7 | | 301 to 400 | 8 | | 401 to 500 | 9 | | 501 to 1,000 | 2% of the total | | 1,001 and over | 20, plus 1 for each 100 over 1,000 |
Two things people miss here.
Van-accessible spaces are a subset, not an addition. §208.2.4 requires that a proportion of your accessible spaces — one in every six, rounded up — be van-accessible. A lot with four accessible spaces needs at least one of them to be a van space. Those are four spaces in total, not five.
The count is per lot, not per property. If your site has several separate parking areas serving different entrances, the scoping generally applies to each. A single cluster of accessible stalls by one door does not cover a lot on the other side of the building.
If you do not know your exact space count, that is the first thing to fix — everything else scales from it. We take the count off a measured layout rather than estimating, because getting it wrong is the single most common failure we find.
The stall is only part of it
An accessible space is a system: the stall, the access aisle beside it, the route from that aisle to an accessible entrance, and the signage that identifies it. All four have to be right.
The access aisle is the marked area beside the stall that lets someone deploy a ramp or open a door fully. Van spaces need a wider aisle than standard accessible spaces, or a wider stall — §502 sets out both the dimensions and the permitted alternatives. Two accessible spaces are allowed to share one aisle between them. An aisle must be marked so it reads clearly as not a parking space, which is why they are hatched.
The access route runs from the access aisle to an accessible entrance, and it must be usable — not merely present. This is where we find the most failures that nobody had noticed: a route that crosses a curb with no ramp, a route that passes behind parked cars, or a route blocked by a planter, a bollard or a dumpster enclosure that was installed years after the lot was marked.
Signage must identify each accessible space, with additional designation for van spaces, mounted high enough that it is visible when a vehicle is parked in the space. §502.6 governs the mounting. A sign that has been knocked down and never replaced is a live problem, not a cosmetic one.
Your walk-round checklist
Take twenty minutes, a phone camera and a tape measure. Photograph anything that looks wrong — dated photos are useful if you later need to show you acted.
- Count the total spaces in the lot, then count the accessible ones. Compare against the scoping table above.
- Count the van-accessible spaces. At least one in six of your accessible spaces must be van-accessible.
- Check every accessible space has a marked access aisle. Hatched, clearly not a parking space, and not shared with a drive aisle.
- Look for the symbol on the pavement. If it has worn to an outline, it needs remarking. These take more foot traffic than anything else painted on your lot.
- Walk the route from each access aisle to the entrance. Do it slowly. Is there a curb with no ramp? Does it pass behind parked cars? Is anything parked, stored or planted in it?
- Check the signs. Present at every accessible space? Van spaces additionally designated? Upright, legible, and not obscured by a parked vehicle or vegetation?
- Check the surface. Accessible spaces and aisles need to be firm, stable and slip-resistant, and reasonably level. Potholes and settled patches in an accessible stall are a real problem.
- Check the location. Accessible spaces should be on the shortest accessible route to the entrance they serve.
- Look for spaces that have quietly disappeared. Restriping done by a contractor who did not know the requirements, or a lot re-laid to add capacity, can remove accessible spaces without anyone noticing.
The failures we find most often
In our experience walking Chicago-area lots, the same handful of problems come up again and again.
Too few accessible spaces for the lot size. Usually because the lot was expanded and the accessible count was never revisited.
A missing or undersized access aisle. Often the aisle was there originally, then a restripe added a space where it used to be.
No van-accessible space at all. Common on lots with only one or two accessible spaces, where the requirement is easy to overlook.
Signage mounted too low, or missing. Signs get hit by ploughs and vehicles. If yours were installed years ago, walk the lot and count them.
Faded symbols. Purely a maintenance problem, and the cheapest thing on this list to fix.
An obstructed access route. The one that most often surprises owners, because nothing about the parking spaces themselves is wrong.
Winter makes this worse
Two Chicago-specific problems worth planning for.
Snow storage is the big one. Access aisles are the most tempting place on a lot to pile ploughed snow — they are conveniently empty and adjacent to the kerb. An access aisle full of snow is an unusable accessible space, and the fact that it is usable again in April is not much comfort in January. Tell your snow contractor explicitly where snow may and may not be piled, and put it in the contract.
The second is wear. Ploughing and salt take markings off faster here than in milder climates, and accessible stall symbols are large areas of paint in high-traffic positions. If you are restriping the lot anyway, the accessible markings are the part most worth getting onto a reliable cycle — see how often you should restripe your parking lot for how to set that interval.
What this means for your property
Most of what fails an accessible parking inspection is cheap to fix and expensive to ignore. Remarking a faded symbol, adding a missing sign or hatching an access aisle correctly are all small jobs. Discovering the same problems through a complaint is a different kind of afternoon.
Two practical steps:
- Do the walk-round this month and photograph what you find. If everything checks out, you have a dated record showing you looked.
- Get the count verified against a measured layout rather than eyeballed. If your lot is near a scoping threshold, this is the difference between compliant and not.
We will walk your lot, photograph what is there and give you a written summary of where it falls short, with no obligation to have us do the remedial work. That is part of our ADA compliance marking and signage service, and it is genuinely useful even if you only want to know where you stand. Call (773) 858-1077 and describe the property.